Mod Organizer 2
In this step, we will install and configure Mod Organizer 2, the best mod manager for any Bethesda game.
- Download the Mod Organizer 2 main file from here
- Once the download has finished, run the installer
- When prompted to choose an install location, pick any location outside of any default Window folders (Like
Program Files x86) and outside of the game's Root folder (The installer's default location will work) - Click Next until the installer finishes
- Run ModOrganizer.exe
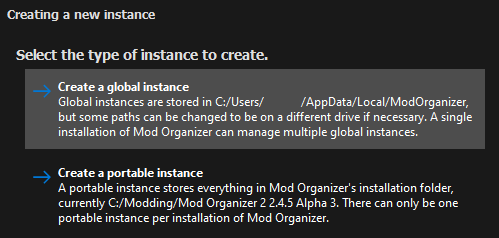
- You will be prompted with a pop-up called Creating an instance, in which you should just select Next
- On the next page, select Create a global instance
- On the next page, select New Vegas
- On the next page, keep the Location file path default
If you have MO2 installed on an SSD or a HDD with little space, you can check the Show advanced options box and change the Downloads file path to a different drive with more space. This will not effect download/game performance, and the downloads can be deleted after the mods have been installed.
- On the last page, select Finish
- MO2 will launch and prompt you with a pop-up called Show tutorial?, in which you should select No
- From the pop-up called Register?, select Yes
- This pop-up will not show up if you have already registered a different instance of MO2
- Once Mod Organizer 2 has loaded, right-click in the right pane and select Enable all
- Order the plugins in the right pane as follows:
- If there is a plugin called FalloutNV_lang.esp in the right pane, navigate to the game's Data folder and delete it
- If you do not know what the game's Data folder is, read the Key Terminology section from the Initial Setup page
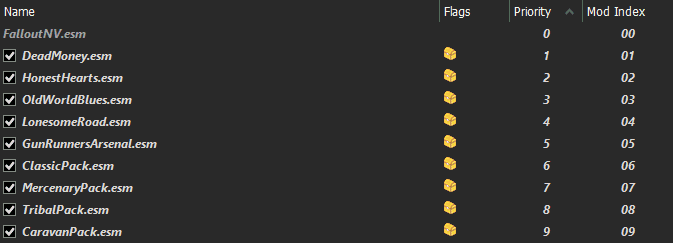
The translation plugin must be deleted because it directly edits thousands of records to change the language, which will cause many incompatibilities with most mods. Because of conflicts like this, the guide unfortunately only supports the English version of the game.
- Select the X in the bottom right of MO2 to close the log window.
- Select the
 button at the top of MO2 to open the settings.
 - In the Theme tab, you can select a different style from the drop-down menu at the top.
- I use the 1809 Dark Mode theme.
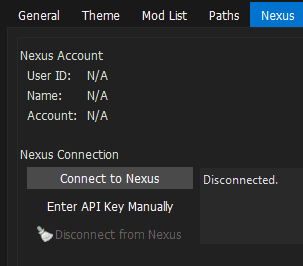
- In the Nexus tab, select Connect to Nexus.
- This option will not show up if you have already connected your Nexus account on a different MO2 instance.
- MO2 will open your browser and prompt you to authorize the connection.
- Once you authorize it, you can close out of your browser and of the MO2 settings.
- Allow MO2 to restart if it asks.
Creating Profiles
Mod Organizer 2's "Profiles" feature allows for easy switching between different mod configurations. In this step, we will create a profile for the guide while keeping a strictly-vanilla profile for testing/de-bugging. Profiles can be selected via the drop-down menu above the left pane.
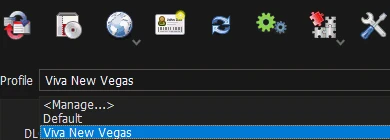
- Select the
 button at the top of MO2 to open the profiles menu.
 - Select the Default profile, then select Copy.
- Name the new profile Viva New Vegas.
- Select the Viva New Vegas profile and make sure both Use profile-specific Game INI Files and Automatic Archive Invalidation are enabled at the bottom.
You may get a pop-up called INI file is read-only when attempting to make/select a new profile. If so then select Remember my choice from the drop-down at the bottom then click Clear the read-only flag.
- Exit out of the profiles menu and select the Viva New Vegas profile from the drop-down above the left pane.
Tweaking FalloutCustom.ini
In this step, we will configure the game's INI files to increase performance/stability. We will take advantage of JIP LN NVSE's FalloutCustom.ini feature to make our changes, which allows for INI changes to be made safely without editing the default INIs. Because of this, these changes will not take affect until you install JIP LN NVSE in the Utilities
- Make sure the Viva New Vegas profile is active.
- Click the
 button at the top of MO2 and select INI Editor.
 - Select the FalloutCustom.ini tab, which should be blank.
- Make sure you are in the FalloutCustom.ini tab and NOT the Custom.ini tab.
- Paste in the following:
Notes
It is highly recommended to avoid changing any other INI settings not in the guide, and to avoid using tools like BethINI. You will realistically not need any other tweaks than the ones already in the guide.
If a mod name is colored yellow it means that the mod is completely subjective and may not be suited for everyone. It can be skipped without any problems.
If a mod is colored red it means that the mod may be performance intensive on lower-end systems. It can be skipped without any problems.
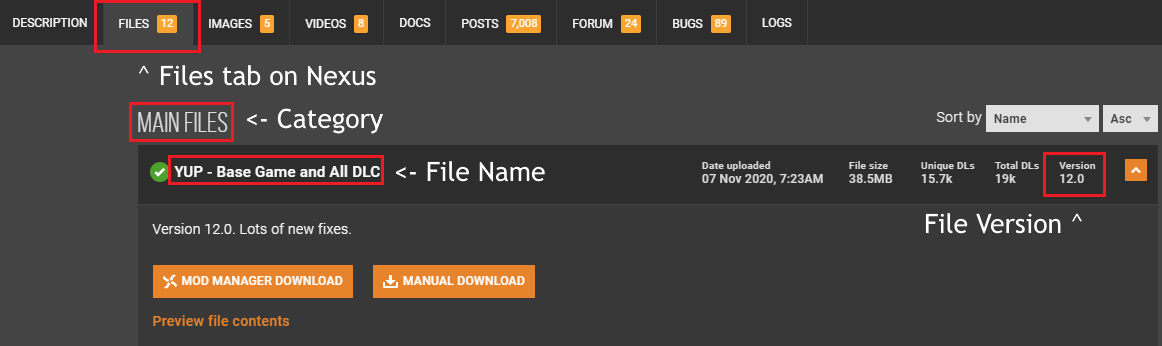
When the guide says to install a mod, it will be formatted as follows: Main File - Example 1.5. This is referring to the mod's category on Nexus and file name.
The guide will list a mod's specific file name, category, and version if you need to do more than just download the latest main file.
Standard mod installation procedure:
- Unless instructed otherwise by the guide, download a mod's latest main file using the Mod Manager Download button.
- Once the download has finished, open Downloads tab in MO2 (Right pane, below executable selector).
- Double click on the mod to install it.
- Enable the mod on the left pane.
Sometimes, a mod will not have a Mod Manager Download, or will be hosted on a site other than Nexus.
If that is the case, do the following:
- Click the Manual Download button (Or whatever the download button is for the respective site).
- Once the download has finished, click the
 button at the top of MO2.
 - From the new window, navigate to where the file was downloaded to and double-click it.
- Finish the install as you would with a Mod Manager Download mod.
You should select the Rename option and rename the mod to its respective file name. This will make MO2 install them as separate files for easier management.
If you are updating from an old version of a mod, you should select Replace. This will delete all the files from the old version of the mod and replace them,with the ones from the new version. This is the only time you should use the Replace option, otherwise always use Rename.
Merge should only be used when you are sure the mod will not be updated and in situations where a hotfix is uploaded as separate file.